Aerial TV is an Android app that allows you to watch DVB-T TV with an RTL-SDR on a mobile device. We posted about Aerial TV back in April and it was available on the Google Play store back then. Unfortunately Aerial TV has recently been banned from the Google Play store as apparently the app can be used to display copyrighted material from TV. The author writes the following on a Facebook post:
Google Play has suspended Aerial TV due to “[Aerial TV] claims to provide copyrighted contents from TV channels”. According to Google apps that display live TV are of “questionable nature”. I am trying to clarify what they mean. I would like to apologize to all affected users. If you have any concerns, feel free to get in touch with Google directly.
This is quite odd and probably a mistake. But if you are looking for Aerial TV it is now available on the Amazon app store with a current 35% discount. If you bought the app on the Google Play store then to get new updates you will need to uninstall it, contact the developer for a refund, and then purchase it again on the Amazon store. More info about that is available on the Facebook page. Updates about it’s availability will always be provided on the official website at aerialtv.eu.
Over on YouTube user radiosification has uploaded a video tutorial that shows how to decode, follow and listen to NXDN/IDAS trunking radio signals. NXDN/IDAS is a narrowband digital voice protocol commonly used with handheld radio terminals.
In the tutorial radiosification explains how to set up DSDPlus and its frequencies text file to automatically listen to and track conversations using the control channel. SDR# is initially used to find the NXDN control and voice channels, which are then entered into the text file. Using this method only DSDPlus and its corresponding receiver FMP is used. Trunking software like Unitrunker is not needed.
Radiosification also notes that the method he presents can also be used for other digital trunking systems such as P25 as well.
Back in May of this year we posted about QIRX SDR, which back then was a brand new multimode SDR program compatible with the RTL-SDR. One of its defining features is that it has a built in DAB+ decoder. Recently QIRX SDR has been updated to version 0.9.1, the new features are quoted below:
General:
Updated Documentation
Device Frontend: Manual Center Freq. Correction in kHz
Waterfall Spectrum
Raw Recording: Playback Control, for a timed positioning (“seek”) in “arbitrary” large (GBytes) recorded raw files.
DAB:
Legacy DAB, intended for users where DAB+ is not generally available, like in the UK or Spain. As this could only be superficially tested here in Germany (no standard DAB any more, I used some raw samples recorded in Madrid), I would be very interested in feedback of users about it.
Synchronization of raw files recorded with central frequency offset
Enhanced manual synchronization control, mainly for tests in mobile environments
Detection of the Transmitter Identifications (TII). However, as this is a feature only useful for specialized applications, it is not included in the distribution. To my knowledge, qirx is the only DAB SDR having this feature.
Some Bug fixing.
The QIRX team have also added a new Quickstart Guide to help users get set up with their software quickly. In addition QIRX author Clem also writes that the QIRX software will be demonstrated during this weekends Ham-Radio fair in Friedrichshafen, Germany.
SDRTrunk is a cross platform Java based piece of software that can be used for following trunked radio conversations. In addition to trunk tracking it also has a built in P25 Phase 1 decoder. Compared to Unitrunker SDRTrunk is an all-in-one package, and currently it supports most trunking system control channels, but unlike Unitrunker it still misses out on some systems EDACS and DMR.
Over on his YouTube channel AVT Marketing has uploaded an excellent 6-part video series that shows how to install SDRTrunk and the Java runtime environment on Ubuntu Linux. The sections covered include, installing Java, setting the Java environment variables, installing other SDRTrunk prerequisites such as Apache Ant and the JMBE audio codec for decoding P25, and finally actually using and setting up SDRTrunk. Like all of AVT’s other videos, this is an excellent tutorial that takes you through the entire process from the very beginning so is useful for beginners as well.
If you’re new to trunking: Trunking systems are typically used with handheld radio systems (e.g. those that police, security guards, workmen etc carry around). The basic idea is that each radio constantly listens to a digital control channel which tells it what frequency to switch to if a call is being made. This allows the frequency spectrum to be shared, instead of designating one fixed frequency per user which would be very inefficient. But this system makes it difficult for scanner radios to listen in to, because the voice frequency could change at any time. Therefore software like Unitrunker and SDRTrunk which can decode the control channel is required. In addition many new systems use digital audio like P25 or DMR which requires digital decoders like SDRTrunk or DSDPlus.
With an RTL-SDR dongle, Raspberry Pi, piece of wire and literally no other hardware it is possible to perform replay attacks on simple digital signals like those used in 433 MHz ISM band devices. This can be used for example to control wireless home automation devices like alarms and switches.
In this tutorial we will show you how to perform a simple capture and replay using an RTL-SDR and RPiTX. With this method there is no need to analyze the signal, extract the data and replay using a 433 MHz transmitter. RPiTX can replay the recorded signal directly without further reverse engineering just like if you were using a TX capable SDR like a HackRF to record and TX an IQ file.
Note that we’ve only tested this replay attack with simple OOK 433 MHz devices. Devices with more complex modulation schemes may not work with this method. But the vast majority of 433 MHz ISM band devices are using simple modulation schemes that will work. Also replay attacks will not work on things like car keys, and most garage door openers as those have rolling code security.
A video demo is shown below:
Hardware used and wireless ISM band devices tested with RPiTX
RpiTX
RPiTX is open source software which allows you to turn your Raspberry Pi into a general purpose transmitter for any frequency between 5 kHz to 500 MHz. It works by using square waves to modulate a signal on the GPIO pins of the Pi. If controlled in just the right way, FM/AM/SSB or other modulations can be created. By attaching a simple wire antenna to the GPIO pin these signals become RF signals transmitted into the air.
Of course this creates an extremely noisy output which has a significant number of harmonics. So to be legal and safe you must always use bandpass filtering. Harmonics could interfere with important life critical systems (e.g. police/EMS radio, aircraft transponders etc).
For testing, a short wire antenna shouldn’t radiate much further than a few meters past the room you’re in, so in this case you should be fine without a filter. But if you ever connect up to an outdoor antenna or amplify the signal then you absolutely must use adequate filtering, or you could find yourself in huge trouble with the law. Currently there are no commercially made 433 MHz filters for RPiTX available that we know of, so you would need to make your own. Also remember that you are still only allowed to transmit in bands that you are licensed to which for most people will be the ISM bands.
In this tutorial we will show how to perform replay attacks on simple OOK modulated 433 MHz ISM band devices using an RTL-SDR dongle and RPiTX. The RTL-SDR will be used to record an AM audio file of the signal, and then RPiTX will do it’s magic to transform that recording into a file that can be transmitted back on the same frequency via one of the Raspberry Pi’s GPIO pins.
Install RPiTX
Installation instructions are available on the RPiTX GitHub page at https://github.com/F5OEO/rpitx. It’s very simple to install as all you need to do is clone the repo, and then run an automated install script.
Install the latest Keenerd version of RTL-SDR
We need the Keenerd version of RTL-SDR as his version provides an option which allows us to output rtl_fm data with a WAV header, allowing us to record directly to a wav file using sox.
git clone https://github.com/keenerd/rtl-sdr
cd rtl-sdr/
mkdir build
cd build
cmake ../ -DINSTALL_UDEV_RULES=ON
make
sudo make install
sudo ldconfig
Install Sox
sudo apt-get install sox
Recording the Data
Using receiver software with a visual spectrum analyzer and/or waterfall like SDR#, GQRX, HDSDR or SDR-Console determine the exact frequency and bandwidth of the digital signal that you want to copy. For example in the image below the center frequency of the signal is 433.897 MHz, and the bandwidth is about 10000 Hz (10 kHz). Also you may want to determine the optimum RF gain settings.
Be aware that many cheap remotes are not particularly frequency accurate and the frequency can change slightly just by the position of your hand on the remote. So be consistent with the way that you handle the remote to ensure that you’re always on frequency.
Example of a 433 MHz device transmitting.
When ready, run the following command on your Pi, press the button on your remote, and then press CTRL+C on the keyboard to stop the recording. Make sure to change the frequency (-f), bandwidth (-s) and gain (-g) to what you determined earlier. This command will record an AM 48 kHz wav file of your keyfob signal. 48 kHz is what RPiTX expects.
Normalizing the audio brings the volume up to the loudest it can be without distorting the waveform. This must be done otherwise the RPiTX output will be weak. Use the following sox command to create the myrec_n.wav normalized wav file.
sox --norm=-3 myrec.wav myrec_n.wav
If you have speakers plugged into your Pi or the HDMI monitor attached to your Pi, you can optionally use the following command to test the recorded audio. You should be able to hear the signal audio playback.
play myrec_n.wav
Create an RFA File
This step converts the wav file into an RFA file, which is a file format used by RPiTX when transmitting. The RFA file format seems to work much better than the IQ options for AM OOK signals.
piam myrec_n.wav myrec.rfa
Transmit with RPiTX
Use the following command to transmit with RPiTX, ensuring that you set the frequency to the correct value for your wireless device.
sudo rpitx -m RFA -i myrec.rfa -f 434004
Troubleshooting
If it doesn’t work first time try these steps:
Make another longer recording with the button pressed down for longer.
Play with the normalization, e.g. try –norm=0 vs –norm=-3.
Ensure that you have a wire attached to the correct pin.
Try the alternative RPiTX pin with the ‘-c 1’ flag.
Leandvb is command line based lightweight DVB-S decoder designed for receiving Digital Amateur TV, including signals like HamTV from the International Space Station. The RTL-SDR can be used together with leandvb and it turns out that leandvb can also be used to decode the Outernet signal. If you were unaware, Outernet is a free L-band based satellite service that provides content such as news, weather data, APRS repeats and more. Currently you can get about 20MB of data a day. Outernet receivers are also all based around the RTL-SDR, allowing for very cheap receivers to be built. At the moment you’ll need a C.H.I.P or their specialized Dreamcatcher hardware to run their special Skylark OS with software decoder, but a general Armbian decoder is in the works.
Alternatively leandvb can be used, and over on their website the folks behind the leandvb software have uploaded a tutorial showing how to use leandvb to decode Outernet. Thanks to some reverse engineering attempts by Daniel Estévez, it was discovered that the Outernet modulation is very similar to DVB-S so the standard decoder can be used with some custom flags. Leandvb only outputs raw frames, not decoded data. They haven’t tested it, but it may be possible to feed the frames into Daniel Estevez’s free-outernet project for obtaining the final files.
During the testing they also discovered some interesting notes about the E4000 and R820T RTL-SDRs. For example by patching the R820T2 drivers to add some additional VGA gain they were able to make the R820T2 chips more sensitive at the Outernet frequency compared to the E4000 chip by bringing the signal further out of the quantization noise. They also tested a 60cm dish vs a patch antenna and found that the dish works significantly better.
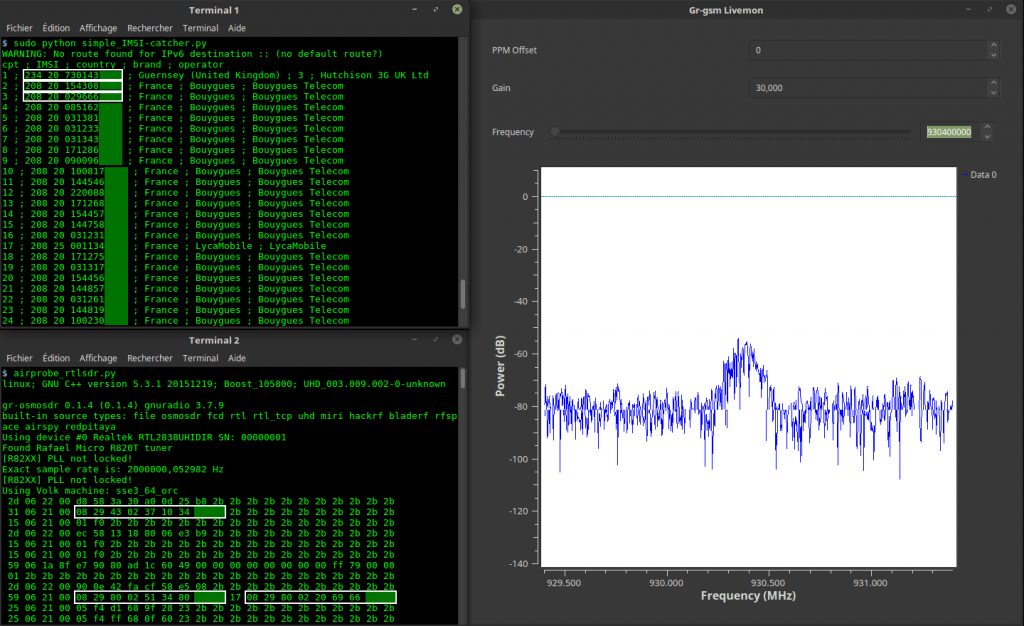
Over on YouTube user Keld Norman has uploaded a video showing how he uses an RTL-SDR with gr-gsm and a Python script to create a simple IMSI catcher. IMSI stands for International mobile subscriber identity and is a unique number that identifies a cell phone SIM card in GSM (2G) mobile phone systems. For security IMSI numbers are usually only transmitted when a connection to a new cell tower is made. More advanced IMSI-catchers used by governmental agencies use a fake cell tower signal to force the IMSI to always be revealed. This way they can track the location of mobile phones as well as other data like who or when you are calling.
In the video Keld uses a Python script called IMSI-Catcher. This script displays the detected IMSI numbers, country, and mobile carrier on a text display. The video description shows how to install GR-GSM and the IMSI-Catcher script on Ubuntu.
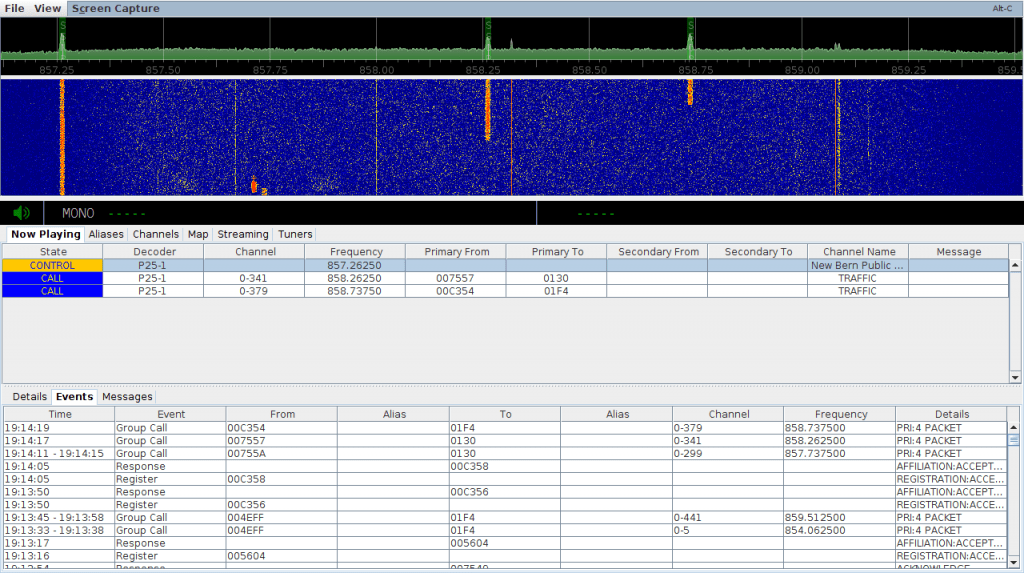
Over on his blog John Hagensieker has uploaded a tutorial that shows how to set up SDRTrunk with RTL-SDR dongles. SDRTrunk is an application that allows you to follow trunked radio conversations, and decode some digital voice protocols such as P25 Phase 1. It is similar to Unitrunker and DSDPlus combined into one program. It is also Java based so it is cross platform and so can be used on Linux and MacOS systems as well.
John’s tutorial contains many useful screenshots, so it should be great for a beginner. He starts from the beginning, with finding trunking frequencies over on radioreference.com, then goes on to the installation and use on Linux. He also later explains how the Airspy can be used instead of multiple RTL-SDR to cover 10 MHz of bandwidth so that multiple systems can be monitored.
SDRTrunk Running and decoding a P25 Phase 1 System
Over on his YouTube channel GusGorman402 has uploaded a video that shows how he was able to capture and decode data from a USGS (United States Geological Service) streamgage.
A streamgage is a sensor for streams and rivers that is used for measuring the amount of water flowing. In particular the ALERT (Automated Local Evaluation in Real-Time) streamgages are designed for the warning of flooding. The ALERT streamgages are wireless with some transmitting data upwards to the GOES-15 geosynchronous satellite with a cross Yagi and some transmitting locally via a standard Yagi. Gus shows if you’re close to a streamgage antenna then you can still receive the signal on the ground with an RTL-SDR. Gus also mentions that all streamgages in his area are slowly being converted to satellite uplink.
His first video simply shows the RTL-SDR receiving a Streamgage satellite uplink signal at 400 MHz. In his second video he moves to a streamgage with terrestrial link at 170 MHz and shows that the data can actually be decoded into a binary string using minimodem. Another program called udfc-node can then be used to turn the data into a human readable format. The binary packets consist of an address that identifies the particular streamgage, and some data that describes the current level of the stream and how much precipitation it has counted.
Back in June Gus Gorman showed us via a YouTube tutorial and demo on how to monitor ATSC (Advanced Train Control System) signals from trains. ATSC is found in the USA and is used for things like communications between trains, rail configuration data, train location data, speed enforcement, fuel monitoring, train diagnostics and general instructions and messages. Gus used an RTL-SDR and the ATSC Monitor software to decode the signals and give us a view of the current state of the railway line.
In his latest video Gus gives a better demonstration of the software by parking outside a train station so that he can receive many more signals from the trains. At the start of the video he shows the track view of BNSF trains, and then later switches over to the Union Pacific track view.
Thank you to Adrian for submitting his video about using the Android App called QRadioLink and an RTL-SDR to decode digital amateur radio voice transmissions. Adrian writes that in the video the RTL-SDR connects to the Android phone with a USB OTG cable and uses a sample rate of 1 MSPS. He also writes the following about QRadioLink:
QRadioLink is a building platform which allows experimenting with VHF-UHF SDR transceivers using different modulation schemes for digital data transmissions. So far digital voice and text transmission is supported, using either a narrow band modem and Codec2 or a high bandwidth modem and Opus. Supported hardware includes the RTL-SDR, Ettus USRP, HackRF, BladeRF and in general all devices supported by libgnuradio-osmosdr.
Over on the SWLing Post blog we’ve seen news of this new SDR based car radio called the Gospell GR-227. Gospell is a Chinese manufacturer of various broadcast consumer radio products including DRM receivers. It is intended to be an adapter for your car that lets you listen to digital broadcast stations such as DAB/DAB+ on VHF and DRM on UHF, but it can also be used for standard AM and FM reception. From the product sheet it looks like it will simply plug into you car USB port, and output audio through that port into your cars head unit. Control of the unit is through an Android app.
There doesn’t seem to be anything stopping someone from using this outside of a car though, so perhaps depending on the price and software hackability available it might make a good PC or Raspberry Pi based HF receiver for all modulation types too.
Over on the Gospell Facebook page are images showing the Gospell running at IBC 2017 and next to other upcoming SDR based digital broadcast receivers like the Titus II.
Gospell SDR Connected to a Car Radio Head Unit
No word yet on a release date or pricing. The press release reads:
Chengdu, China, September 04, 2017 – A new adaptor specifically designed for in-car use that simplifies digital radio on the road will be introduced at IBC by Gospell.
GR-227 is a small, low-cost adaptor that acts as an aftermarket add-on to car stereos receiving high-quality digital broadcast programs and data application, and serving it to the car audio system over a USB cable. Based on software defined radio technology, GR-227 is compatible with DAB, DAB+, DRM and is DRM+ ready. It is also powerful enough to support digital audio decoding such as extended HE-AAC (xHE-AAC).
GR-227 literally works with any kind of car stereos with a USB port. Our patent pending technology allows the adaptor to behave like a thumb drive when plug into a USB port and makes it compatible with most of the music players not only in car but also for home use.
To make the most of GR-227, the Gospell Smart Tune App for Android has been included to add more features. When partnered with an Android powered car stereo, the App not only allows for playback of the broadcast audio program but data application which brings much fun to car entertainment.
By connecting the supplied triple band active antenna which can be attached to the windscreen through the SMA antenna connector, the reception in DRM, FM and DAB bands can be significantly improved, offering maximum flexibility between different broadcasting standards.
Installing the plug-and-play GR-227 adaptor to your car is easy and doesn’t require changing your car stereo. It is one of the easiest ways to upgrade your car radio to digital without replacing anything.
The Gospell’s aftermarket car adaptor range starts with USB model but more will follow to support more car stereo types.
Haochun Liu, DRM director, Gospell, said: “By leveraging SDR, we can now combine multiple broadcasting standards together to offer flexibility and cost advantages, coupled with easy installation without the necessity of buying a new car stereo as in traditional solutions.”
For additional information, please visit www.goscas.com or contact Gospell sales at linx@gospell.com.
About Gospell
Founded in 1993, Gospell Digital Technology Co Ltd (GOSPELL). is a private hi-tech enterprise with R&D, manufacturing, business consultancy and planning, trade, delivery, project implementation and after sales service, acting as a complete DTV and triple-play solution provider for Digital TV/OTT related projects. Headquartered in GOSPELL INDUSTRIAL PARK at Chenzhou, Hunan Province for CPE related production manufacturing, GOSPELL also has its office in Shenzhen for business/marketing management and administration, in Chengdu for R&D and headend/transmitter system production/debugging and Customer Service Center, and in 12 cities in China as well as international offices in India, Africa and Mexico.
A few months ago satellite data broadcasting company Outernet created a limited number of prototype receivers that combined an L-band satellite patch antenna, LNA and RTL-SDR into a signal unit. This was never produced in bulk as they found it to be too noisy having the RTL-SDR so close to the antenna, but nevertheless it still worked fairly well.
Over on YouTube max30max31 bought one of these prototype units and made a video about using it for receiving and decoding various L-band satellite signals. In the video he first shows an overview of the product and then shows it receiving and/or decoding some signals like Inmarsat STD-C, AERO and Inmarsat MFSK.
As part of their senior project Matthew May & Brendan Harlow of Champlain College worked on a project that involved creating their own software defined radio based portable cell phone network. If you're interested their setup is nicely documented on their project page. Basically it consists of a bladeRF software defined radio and Raspberry Pi running the YateBTS base station software. This is nothing new in terms of work done before, but the clear documentation makes it a good starting point for anyone looking at building their own SDR based cell basestation.
A custom cell basestation may be useful for those in remote areas without commercial cell phone reception, during disasters or even just to create a type of secondary network in your home.
[Also seen on Hackaday and Motherboard]
A cell phone connected to their custom network
Most modern vehicles use some form of rolling code security on their wireless keyfobs to prevent unauthorized replay attacks. When the car owner presses a button on the keyfob, a unique rolling code is sent to the car. If it matches one of the codes currently stored in the car, the car will unlock and then invalidate that code so it can never be used again, thus preventing a replay attack. On the next press the keyfob sends a new code. In most designs when a code is used up, a new code is added to the list of valid codes via a random number generator based on a secure algorithm only known (presumably) to the engineers.
Essentially Tom found that instead of producing a randomly generated rolling code, the Subaru keyfob simply increments the rolling code number each time. This allows an attacker to perform a second key press simply recording an initial real key press, decoding the packet, increasing the decoded rolling code by one, then re-transmitting. It also means that the attacker could continually raise the rolling code value on the car himself, which would eventually make the real keyfob useless as the codes on the keyfob would be outdated and no longer match the same number range as the car.
The entire exploit was found on a super low budget. Tom used only an RTL-SDR and Raspberry Pi. The receive is obviously handled by the RTL-SDR, but the transmit side is handled by RPiTX which is software that allows the Raspberry Pi to transmit RF signals directly from a GPIO pin without the need for any additional transmitting hardware. Tom writes that the exploit probably affects the 2006 Subaru Baja, 2005 - 2010 Subaru Forester, 2004 - 2011 Subaru Impreza, 2005 - 2010 Subaru Legacy and the 2005 - 2010 Subaru Outback. Tom also writes that various dealers and spokes people have contacted him stating that the exploit probably only affects US models. If you have one of the affected models and are worried the only way to stay safe is to simply not use wireless entry on the keyfob, at least until/if Subaru fixes the issue with a recall. Although so far no statement from Subaru has been released.
Tom has also uploaded a demonstration video to YouTube which is shown below.
Back in September we posted [1, 2] about the QRadioLink software which is an RTL-SDR compatible digital amateur radio voice decoder and encoder program for Linux and Android (with chroot). It supports modern digital voice codecs like Codec2 and Opus. It is capable of being used with multiple SDRs, and can be used for transmitting digital voice too if you have a transmit capable SDR.
Andrian the developer recently wrote in to let us know that QRadioLink now has a website at qradiolink.org that you can follow for updates about its development. The website also explains some of the features of the software, and lists possible performance values of digital voice. The features include:
Receives and transmits analog voice, digital voice, low resolution video, text, IP protocol.
Narrow band modem with Codec2 or wideband modem and Opus.
Digital Modems: BPSKQPSK2FSK4FSK
Modes: narrow FM, SSB, digital voice, digital video, digital data
Typical Receiver performance is given in the following table, with all values being measured on an R820T RTL-SDR.
Mode
Condition
Sensitivity (dBm)
Codec2 700B
20 db SINAD
-115
Codec2 1400
20 db SINAD
-112
Opus
20 db SINAD
-102
Narrow FM
12 db SINAD
-118
In the future Adrian hopes to expand the software to include features like VOIP integration, SSB transceiver, DTMF & CTCSS encoder/decoders, multi-channel RX, HD video, remote control and a GUI improvement.
If you didn't know already Bitcoin is the top cryptocurrency which in 2017 has begun gaining traction with the general public and skyrocketing to a value of over $19,000 US per coin at one point. In addition to providing secure digital transactions, cryptocurrencies like Bitcoin are intended to help fight and avoid censorship. But despite this there is no real protection from the Bitcoin internet protocol being simply blocked and censored by governments with firewalls or by large ISP/telecoms companies.
One idea recently discussed by Nick Szabo and Elaine Ou at the "Scaling Bitcoin 2017" conference held at Stanford University is to use the something similar to WSPR (Weak Signal Propagation Reporting Network) to broadcast the Bitcoin network, thus helping to avoid internet censorship regimes. To test their ideas they set up a HackRF One as a transmitter and RTL-SDR and used GNU Radio to create a test system.
Over on his blog "ele y ciencia" has written up two very useful blog posts - one on how to decode AFSK signals from scratch and the other on how to reverse engineer any unknown digital signal. The blog is written entirely in Spanish, but Google translate does a decent enough job at getting the message across (in Chrome right click anywhere on the page and select Translate to English or use the Google translate webpage).
The first post is about decoding an AFSK protocol and explains that you need to record the signal with an RTL-SDR or other SDR, apply a low pass filter to obtain the signal envelope and then apply thresholding with the known baud rate to obtain the demodulated digital signal. The tutorial is high level and just explains the process, but doesn't show how to do it in any software. Later on in the post he goes on to show how he reverse engineered a train-land radiotelephone system and a TCM3105 modem chip which utilizes a FSK system.
In the second post he shows how to decode any unknown digital signal using just an RTL-SDR and Audacity. He starts off with finding and recording an unknown digital signal with an RTL-SDR and then reverse engineers it in a sort of manual fashion without using any tools like Universal Radio Hacker. The post goes through the full details and steps that he took, and in the end he gets data out of the signal discovering that it is data from a Fleet Management System used in his country for monitoring data such as speed and engine data from commercial vehicles like trucks and buses.
The two posts are very detailed and could be an excellent reference for those interested in reverse engineering some unknown digital signals in your area.
Decoding an Unknown "Fleet Management" signal from scratch.
During the Hackaday superconference held during November 2017, Samy Kamkar presented a talk on how he reverse engineers devices, and in particular passive entry and start systems in vehicles. In the talk he also explains what tools he uses which includes SDRs like the HackRF One and RTL-SDR dongle and explains the methodology that he takes when looking at how to reverse engineer any new device. Samy is most famous for writing the Samy MySpace computer worm and also popularizing the "RollJam" wireless car door vulnerability. The talk blurb reads:
In this talk Samy Kamkar shares the exciting details on researching closed systems & creating attack tools to (demonstrate) wirelessly unlocking and starting cars with low-cost tools, home made PCBs, RFID/RF/SDR & more. He describes how to investigate an unknown system, especially when dealing with chips with no public datasheets and undisclosed protocols. Learn how vehicles communicate with keyfobs (LF & UHF), and ultimately how a device would work that can automatically detect the makes/models of keyfobs nearby. Once the keyfobs have been detected, an attacker could choose a vehicle and the device can wirelessly unlock & start the ignition. Like Tinder, but for cars.
Over on YouTube user Evariste Okcestbon has uploaded a video showing his simple pocket DATV system that consists of a LimeSDR running on a Raspberry Pi Zero transmitting live camera images via DATV which is received by an RTL-SDR running on a Raspberry Pi 3.
If you didn't already know, DATV stands for Digital Amateur Television and is a digital mode somewhat similar to digital over the air TV signals that can be used by hams for transmitting their own TV signals on the ham bands. The LimeSDR Mini is a $139 US transmit and receive capable SDR that is currently crowdfunding and available for pre-order on Crowdsupply. It is expected to ship at the end of February 2018.
Evariste uses a range of software packages on each Raspberry Pi. He writes the following in the video description:
Description of a minimal Digital Tv chain : Transmitter and Receiver.
Hardware used on Tx : PiZero,Picam,LimeSDR Mini
Hardware used on Rx : Raspberry Pi 2, RTL-SDR,Monitor
Software used on Tx : avc2ts,dvb2iq,limetx
Software used on Rx : rtl_sdr,leandvb,kisspectrum,ts2es,hello_video
Evariste is also the author of Rpidatv which allows you to transmit DATV directly from the GPIO pins of a Raspberry Pi without the need for any transmit capable SDR.