The new software requires a different DVB-T driver app to be installed first, which is also provided by Martin. This is because the RTL-SDR needs to be operated in a mode different to the way that the SDR drivers use it in. Martin has also open sourced his Android DVB-T driver and it is available on GitHub.
Aerial TV is currently free on the Google Play store, but looks like it may eventually have some in-app purchases. Also, it is currently marked as ‘Unreleased’ on Google Play, which is essentially a beta version, so you might expect there to be some bugs.
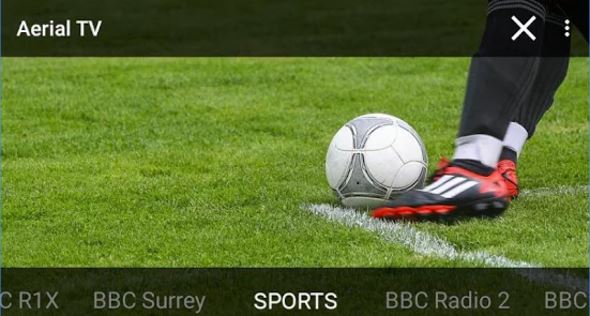
Aerial TV Screenshot
Over on YouTube user GiamMa-based researchers SDR R&D IoT has uploaded a video showing Aerial TV scanning for TV channels, and then eventually playing some video.
The free versions of both decoders only decode the EGC broadcast messages which contain SafetyNET messages. These include messages like weather reports, shipping lane activity and hazards such as submarine cables and oil rig movements, pirate activity, refugee ship reports, missing ship reports, and military exercise warnings.
The paid version can decode the other non-broadcast private LES STD-C channels. LES STD-C channels typically contain email like messages sent to and from ships. Mostly it’s company messages about the ship route plans, cargo discussions, repair/fault discussions, ship performance information and weather reports etc. Each Inmarsat satellite contains about 7 LES channels each run by a different telecommunications company, so one may be of interest to you.
Tekmanoid STD-C Decoder Receiving LES Message.
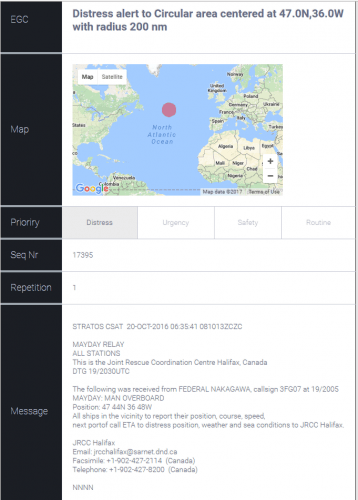
The paid version of the Tekmanoid decoder also has a nice feature for visualizing the SafetyNET EGC messages. Every now and then an alert containing coordinates and an area is sent out. Usually it is something like a distress alert from an EPIRB or the search area for a missing vessel. The decoder generates an HTML file that displays these areas on a map, alongside the text message.
STD-C EGC Distress Alert on map
The author of the Tekamnoid software allowed us to test his new paid version for free. We ran the software using signal from an Outernet patch antenna and LNA. An RTL-SDR V3. SDR# was used as the receiver, and the audio was piped to the Tekmanoid decoder with VB-Cable. Decoding was almost flawless on both LES and EGC STD-C channels. In a previous recent update the Tekmanoid decoder was updated for improved decoding performance, and now in our opinion it is almost or just as good as the inmarsatdecoder.com software.
If you are interested in learning more about decoding Inmarsat STD-C we have a tutorial available here. LES channels for the Inmarsatellite in operation over your geographic location can be found on UHF-Satcom’s website.
LES STD-C Inmarsat Channels
Remember that LES STD-C messages are not publicly broadcast, so in some countries it may not be legal to receive them. Most countries will have a law that says you can receive and decode the data, but you may not act upon or use to your advantage any information from the messages.
The Pi Zero is one of the cheapest single board computers available, costing only $5 USD, and the wireless model with WiFi connectivity only costs $10 USD. It is powerful enough with its 1 GHz CPU and 512 MB of RAM to run an RTL-SDR and run several non CPU intensive applications such as ADS-B decoding.
The tutorial starts from the beginning by installing a fresh Raspbian image onto the Pi Zero. He then goes on to show how to install the PiAware tracking and feeding software from flightaware.com. Later in the tutorial he also shows how to collect data straight from the flightaware.com API, and also how to build and control an RGB matrix which can display live flight numbers.
Last year during a Russian wireless ‘capture the flag’ (CTF) competition one of the goals was to reverse engineer a remote controlled toy tank, and then to control it with a HackRF. One of the Russian CTF teams has posted a thorough write up on the reverse engineering process that was used on the toy tank (the link is in Russian, but Google Translate works okay).
The write up first shows the reception of the signal from the wireless controller, and then moves on to show how to receive it in GNU Radio and obtain a time domain graph of the digital signal. From the pulses it is simple to visually work out the binary string. Next an instruction decoder is created in GNU Radio which automatically obtains the binary string from the signal directly. Then once the codes for back, forward, left and right were obtained it was possible to write another GNU Radio program to transmit these codes to the RC toy tank from the HackRF.
Last month we posted about Aerial TV, a new Android based DVB-T decoder that works with RTL-SDR dongles. Back then the app was still in beta testing and had a few operational bugs. Now the Aerial TV app has been officially released.
The app is based on the new Android DVB-T driver for RTL2832U devices which is written by Martin Marinov who is also the programmer of Aerial TV. The DVB-T driver is open source, and currently supports RTL2832U devices with the R820T, E4000, R828D, FC0012 and FC0013 tuner chips. Of note is that the R828D also has DVB-T2 support.
Aerial TV is free to download and test, but requires a $7.99 licence to use for more than 30 minutes. To use it you will need an OTG (On-the-go) cable adapter and an RTL-SDR dongle with antenna.
Just watch TV – no data plan or wifi connection required. Aerial TV works by picking up digital TV channels off the air with a regular TV antenna.
You will need a low cost USB TV tuner. You can grab one online for less than €10. Make sure to get an RTL2832 tuner. When it arrives, just connect the provided antenna and start watching. You may need a USB OTG cable to plug the tuner in your Android device. USB OTG cables are inexpensive and easy to find.
Note that your Android device must support USB OTG. If unsure, do a quick search online or consult your Android device manual. Also check that there is DVB-T/DVB-T2 service in your local area by doing a quick search online. Signal needs to be strong enough for Aerial TV to pick it up. For best results use an outdoor aerial.
You get free unlimited access to radio forever. You also get to watch all TV channels and experience all features of Aerial TV during the trial period for free. After the trial period ends you can make a one-off purchase and watch as much TV as you want. Remember: you can keep listening to radio even if the trial has ended!
Q: How do I find a supported dongle? A: All major RTL2832 (rtl-sdr) dongles are supported. These dongles can be easily purchased online. Just type in “RTL2832” or “RTL2832U” in the search box of your favourite online store.
Q: What tuner do I need to watch DVB-T2? A: If your country has DVB-T2 broadcasts (such as Freeview HD in UK) you will need a DVB-T2 compatible receiver dongle such as R828D in order to watch DVB-T2 with Aerial TV.
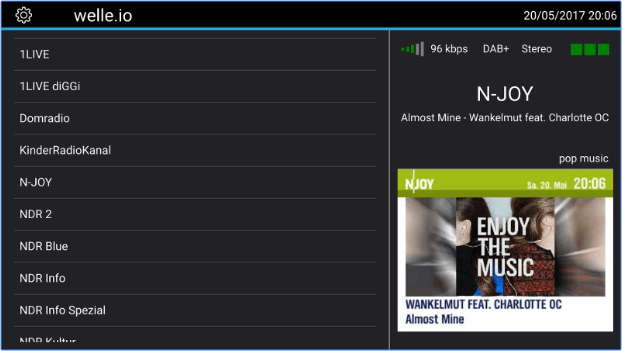
Back in March of this year we posted about “Welle.io”, a DAB/DAB+ decoder that supports the RTL-SDR and other SDRs like the Airspy. It was available for Windows, Linux and Raspberry Pi 2/3.
The only other app that we’ve seen which is capable of decoding DAB/DAB+ on Android is Wavesink. Wavesink costs $14.90 USD on the Google Play store, but there is a free trial version available with runtime limitations and no DAB+ support.
Albrecht notes that the app is fairly computationally intensive and will require an Android device with at least 4 cores and a clock speed of 1.3 GHz to run the app. He also mentions that they are also looking for any interested developers and translators to help with development of the app.
Over on YouTube user AVT Marketing has uploaded a five part video series that very clearly and slowly shows how to use an RTL-SDR to set up trunking and digital voice monitoring. In the videos he uses SDR#, Unitrunker, DSD+ and VBCable for the monitoring.
The first video in the series shows a brief overview of the digital trunking voice set up, and explains a bit about digital voice communications. The second video shows how to install an RTL-SDR, and walks you through downloading Unitrunker and DSD+. The third video is a tutorial about SDR# and also explains how trunking radio systems works. The fourth video shows how to install Unitrunker, DSD+, VBCable, and how to configure each program. Finally the fifth and last video in the series shows the final steps in using Unitrunker and DSD+.
This looks like a very good video series, especially for those that like to see every step in the process played out in full.
LilacSat-1 is an educational CubeSat built by students from the Harbin Institute of Technology (HIT) in China. It was recently launched from the ISS on 25 May 2017 as part of the QB50 science experiment to explore the lower thermosphere, and it is expected to stay in orbit for about 3 months. Apart from BPSK telemetry at 145.935 MHz, LilacSat-1 is interesting because it contains on board an FM to Codec2-BPSK digital voice amateur radio transponder at 145/436 MHz (uplink/downlink). It is probably the first amateur radio satellite to contain an FM to digital voice transponder.
To decode LilacSat-1 digital voice and telemetry you can use a Linux live CD provided by HIT, or download the GNU Radio decoder directly from the LilacSat-1 information page on the HIT website. The GNU Radio program can be used with any GNU Radio compatible SDR, such as an RTL-SDR.
An example of LilacSat-1 being decoded has also been uploaded by YouTube by Scott Chapman. In his test he used an RTL-SDR to work the pass live, but in the video shows an offline decoding received by his SDRplay which was also monitoring the same pass.
Over on his YouTube channel GusGorman402 has uploaded a tutorial which shows how he monitors ATCS (Advanced Train Control System) signals from trains. ATCS signals are found in the USA, and is used for things like communications between trains, rail configuration data, train location data, speed enforcement, fuel monitoring, train diagnostics and general instructions and messages.
In the video he first shows how to determine the frequency of trains signals in your area by using the US FCC database. He then shows how to download and install the ATCSMonitor software which is used for decoding the signals, and then walks us through configuring the correct settings within the software. The train signal audio is piped from SDR# to ATCSMonitor via VBCable, and received with an RTL-SDR and simple whip antenna.
Later in the video he shows how to fully set up the software with train databases so that the actual spotted train names show up. He also shows how to set up the dispatcher display which visually shows the current train locations and track configurations.
GusGorman402 has uploaded the tutorial in two videos. The first shows the full tutorial, configuration and demo for trains in the BNSF fleet. The second video shows how to monitor the Union Pacific fleet which uses a different protocol, which requires a slightly different set up in ATCSMonitor.
Thank you to Dave for submitting information about his new pager message display software called PagerMon. PagerMon is a web browser based tool for displaying POCSAG pager messages decoded by multimon-ng. It is based around nodejs and uses a sqlite database for storing the messages. Multimon-ng is an RTL-SDR compatible digital mode decoder which can decode multiple protocols including POCSAG pagers.
PagerMon and the features and future features are listed below:
PagerMon is an API driven client/server framework for parsing and displaying pager messages from multimon-ng.
It is built around POCSAG messages, but should easily support other message types as required.
The UI is built around a Node/Express/Angular/Bootstrap stack, while the client scripts are Node scripts that receive piped input.
Features
Capcode aliasing with colors and FontAwesome icons
API driven extensible architecture
Single user, multiple API keys
SQLite database backing
Configurable via UI
Pagination and searching
Filtering by capcode or agency
Duplicate message filtering
Keyword highlighting
WebSockets support – messages are delivered to clients in near realtime
Pretty HTML5
May or may not contain cute puppies
Planned Features
Multi-user support
Other database support (MongoDB and DynamoDB planned)
Horizontal scaling
Enhanced message filtering
Bootstrap 4 + Angular 2 support
Enhanced alias control
Graphing
Push notifications
Non-sucky documentation
The GitHub readme has a getting started section which shows how to set up the server and get it running on your local machine.
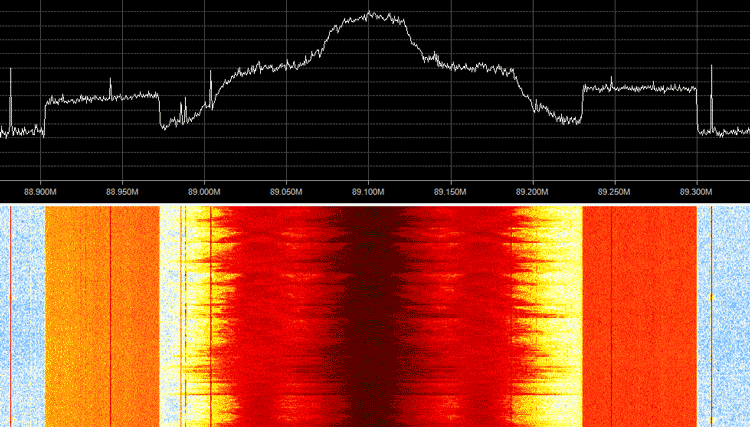
HD Radio is a high definition terrestrial digital broadcast signal that is only used in North America. It is easily recognized by the two rectangular blocks on either side of a broadcast FM station signal on a spectrum analyzer/waterfall display. Since HD Radio uses a proprietary protocol, finding a way to decode it has been difficult and so this signal has been inaccessible to SDR users for a long time. Back in February of this year we posted about Phil Burrs attempt, where he was able to create a partial implementation (up to layer 2) of the HD Radio standard, but didn’t get far enough to decode any audio in layer 3.
However, now cyber security researcher ‘Theori’ has created a full RTL-SDR based decoder for the HD Radio protocol. In his post Theori explains that the HD Radio system is split into three layers. Layer 1 finds the signals and does decoding and error correction. Layer 2 is a multiplexing layer, which allows various layer 3 applications to share the bandwidth. Layer 3 is the audio data layer. In his post he explains how these layers work in detail.
One of the main findings was the discovery of the audio compression codec. Theori found that the codec was essentially HE-AAC with some minor modifications. The modifications were minor enough that he was able to adapt the open source FAAD2 library for HD Radio audio decoding.
Theori’s code is open source and available on GitHub. The code includes the patch to modify FAAD2 for HD Radio and it is automatically applied during the build. A sample file for testing the decoder is also provided and we tested the decoder with the sample and it worked well. The decoding can also be performed in real time and examples of that are also on the git readme.
Over on his YouTube channel Adam 9A4QV has uploaded a video that shows him receiving the NOAA 19 HRPT signal at 1698 MHz with his HackRF, LNA4ALL and the simple circularly polarized cooking pot antenna that we saw in his last videos.
HRPT stands for High Resolution Picture Transmission and is a digital protocol that is used on some satellites to transmit much higher resolution weather images when compared to the APT signal that most people are familiar with receiving. The HRPT signal is available on NOAA19, which also transmits APT. However, unlike APT which is at 137 MHz, HRPT is at 1698 MHz, and is typically a much weaker signal requiring a higher gain motorized tracking antenna.
However in the video Adam shows that a simple cooking pot antenna used indoors is enough to receive the signal (weakly). The signal is probably not strong enough to achieve a decoded image, but perhaps some tweaks might improve the result.
Over on his Reddit thread about the video Adam mentions that a 90cm dish, with a proper feed and two LNA4ALLs should be able to receive the HRPT signal easily. User devnulling also gives some very useful comments on how the software side could be set up if you were able to achieve a high enough SNR.
GNU Radio has HRPT blocks in the main tree (gr-noaa) that work well for decoding and then David Taylor has HRPT reader which will generate an image from the decode GR output. http://www.satsignal.eu/software/hrpt.htm
http://usa-satcom.com has a paid HRPT decoder that runs on windows that has some improvements for lower SNR locking and works very well.
– devnulling
On a previous post we showed @uhf_satcom‘s HRPT results where he used a motorized tracking L-band antenna and HackRF to receive the signal. Some HRPT image examples can be found in that post.
Aerial TV is an Android app that allows you to watch DVB-T TV with an RTL-SDR on a mobile device. We posted about Aerial TV back in April and it was available on the Google Play store back then. Unfortunately Aerial TV has recently been banned from the Google Play store as apparently the app can be used to display copyrighted material from TV. The author writes the following on a Facebook post:
Google Play has suspended Aerial TV due to “[Aerial TV] claims to provide copyrighted contents from TV channels”. According to Google apps that display live TV are of “questionable nature”. I am trying to clarify what they mean. I would like to apologize to all affected users. If you have any concerns, feel free to get in touch with Google directly.
This is quite odd and probably a mistake. But if you are looking for Aerial TV it is now available on the Amazon app store with a current 35% discount. If you bought the app on the Google Play store then to get new updates you will need to uninstall it, contact the developer for a refund, and then purchase it again on the Amazon store. More info about that is available on the Facebook page. Updates about it’s availability will always be provided on the official website at aerialtv.eu.
Over on YouTube user radiosification has uploaded a video tutorial that shows how to decode, follow and listen to NXDN/IDAS trunking radio signals. NXDN/IDAS is a narrowband digital voice protocol commonly used with handheld radio terminals.
In the tutorial radiosification explains how to set up DSDPlus and its frequencies text file to automatically listen to and track conversations using the control channel. SDR# is initially used to find the NXDN control and voice channels, which are then entered into the text file. Using this method only DSDPlus and its corresponding receiver FMP is used. Trunking software like Unitrunker is not needed.
Radiosification also notes that the method he presents can also be used for other digital trunking systems such as P25 as well.
Back in May of this year we posted about QIRX SDR, which back then was a brand new multimode SDR program compatible with the RTL-SDR. One of its defining features is that it has a built in DAB+ decoder. Recently QIRX SDR has been updated to version 0.9.1, the new features are quoted below:
General:
Updated Documentation
Device Frontend: Manual Center Freq. Correction in kHz
Waterfall Spectrum
Raw Recording: Playback Control, for a timed positioning (“seek”) in “arbitrary” large (GBytes) recorded raw files.
DAB:
Legacy DAB, intended for users where DAB+ is not generally available, like in the UK or Spain. As this could only be superficially tested here in Germany (no standard DAB any more, I used some raw samples recorded in Madrid), I would be very interested in feedback of users about it.
Synchronization of raw files recorded with central frequency offset
Enhanced manual synchronization control, mainly for tests in mobile environments
Detection of the Transmitter Identifications (TII). However, as this is a feature only useful for specialized applications, it is not included in the distribution. To my knowledge, qirx is the only DAB SDR having this feature.
Some Bug fixing.
The QIRX team have also added a new Quickstart Guide to help users get set up with their software quickly. In addition QIRX author Clem also writes that the QIRX software will be demonstrated during this weekends Ham-Radio fair in Friedrichshafen, Germany.
SDRTrunk is a cross platform Java based piece of software that can be used for following trunked radio conversations. In addition to trunk tracking it also has a built in P25 Phase 1 decoder. Compared to Unitrunker SDRTrunk is an all-in-one package, and currently it supports most trunking system control channels, but unlike Unitrunker it still misses out on some systems EDACS and DMR.
Over on his YouTube channel AVT Marketing has uploaded an excellent 6-part video series that shows how to install SDRTrunk and the Java runtime environment on Ubuntu Linux. The sections covered include, installing Java, setting the Java environment variables, installing other SDRTrunk prerequisites such as Apache Ant and the JMBE audio codec for decoding P25, and finally actually using and setting up SDRTrunk. Like all of AVT’s other videos, this is an excellent tutorial that takes you through the entire process from the very beginning so is useful for beginners as well.
If you’re new to trunking: Trunking systems are typically used with handheld radio systems (e.g. those that police, security guards, workmen etc carry around). The basic idea is that each radio constantly listens to a digital control channel which tells it what frequency to switch to if a call is being made. This allows the frequency spectrum to be shared, instead of designating one fixed frequency per user which would be very inefficient. But this system makes it difficult for scanner radios to listen in to, because the voice frequency could change at any time. Therefore software like Unitrunker and SDRTrunk which can decode the control channel is required. In addition many new systems use digital audio like P25 or DMR which requires digital decoders like SDRTrunk or DSDPlus.
With an RTL-SDR dongle, Raspberry Pi, piece of wire and literally no other hardware it is possible to perform replay attacks on simple digital signals like those used in 433 MHz ISM band devices. This can be used for example to control wireless home automation devices like alarms and switches.
In this tutorial we will show you how to perform a simple capture and replay using an RTL-SDR and RPiTX. With this method there is no need to analyze the signal, extract the data and replay using a 433 MHz transmitter. RPiTX can replay the recorded signal directly without further reverse engineering just like if you were using a TX capable SDR like a HackRF to record and TX an IQ file.
Note that we’ve only tested this replay attack with simple OOK 433 MHz devices. Devices with more complex modulation schemes may not work with this method. But the vast majority of 433 MHz ISM band devices are using simple modulation schemes that will work. Also replay attacks will not work on things like car keys, and most garage door openers as those have rolling code security.
A video demo is shown below:
Hardware used and wireless ISM band devices tested with RPiTX
RpiTX
RPiTX is open source software which allows you to turn your Raspberry Pi into a general purpose transmitter for any frequency between 5 kHz to 500 MHz. It works by using square waves to modulate a signal on the GPIO pins of the Pi. If controlled in just the right way, FM/AM/SSB or other modulations can be created. By attaching a simple wire antenna to the GPIO pin these signals become RF signals transmitted into the air.
Of course this creates an extremely noisy output which has a significant number of harmonics. So to be legal and safe you must always use bandpass filtering. Harmonics could interfere with important life critical systems (e.g. police/EMS radio, aircraft transponders etc).
For testing, a short wire antenna shouldn’t radiate much further than a few meters past the room you’re in, so in this case you should be fine without a filter. But if you ever connect up to an outdoor antenna or amplify the signal then you absolutely must use adequate filtering, or you could find yourself in huge trouble with the law. Currently there are no commercially made 433 MHz filters for RPiTX available that we know of, so you would need to make your own. Also remember that you are still only allowed to transmit in bands that you are licensed to which for most people will be the ISM bands.
In this tutorial we will show how to perform replay attacks on simple OOK modulated 433 MHz ISM band devices using an RTL-SDR dongle and RPiTX. The RTL-SDR will be used to record an AM audio file of the signal, and then RPiTX will do it’s magic to transform that recording into a file that can be transmitted back on the same frequency via one of the Raspberry Pi’s GPIO pins.
Install RPiTX
Installation instructions are available on the RPiTX GitHub page at https://github.com/F5OEO/rpitx. It’s very simple to install as all you need to do is clone the repo, and then run an automated install script.
Install the latest Keenerd version of RTL-SDR
We need the Keenerd version of RTL-SDR as his version provides an option which allows us to output rtl_fm data with a WAV header, allowing us to record directly to a wav file using sox.
git clone https://github.com/keenerd/rtl-sdr
cd rtl-sdr/
mkdir build
cd build
cmake ../ -DINSTALL_UDEV_RULES=ON
make
sudo make install
sudo ldconfig
Install Sox
sudo apt-get install sox
Recording the Data
Using receiver software with a visual spectrum analyzer and/or waterfall like SDR#, GQRX, HDSDR or SDR-Console determine the exact frequency and bandwidth of the digital signal that you want to copy. For example in the image below the center frequency of the signal is 433.897 MHz, and the bandwidth is about 10000 Hz (10 kHz). Also you may want to determine the optimum RF gain settings.
Be aware that many cheap remotes are not particularly frequency accurate and the frequency can change slightly just by the position of your hand on the remote. So be consistent with the way that you handle the remote to ensure that you’re always on frequency.
Example of a 433 MHz device transmitting.
When ready, run the following command on your Pi, press the button on your remote, and then press CTRL+C on the keyboard to stop the recording. Make sure to change the frequency (-f), bandwidth (-s) and gain (-g) to what you determined earlier. This command will record an AM 48 kHz wav file of your keyfob signal. 48 kHz is what RPiTX expects.
Normalizing the audio brings the volume up to the loudest it can be without distorting the waveform. This must be done otherwise the RPiTX output will be weak. Use the following sox command to create the myrec_n.wav normalized wav file.
sox --norm=-3 myrec.wav myrec_n.wav
If you have speakers plugged into your Pi or the HDMI monitor attached to your Pi, you can optionally use the following command to test the recorded audio. You should be able to hear the signal audio playback.
play myrec_n.wav
Create an RFA File
This step converts the wav file into an RFA file, which is a file format used by RPiTX when transmitting. The RFA file format seems to work much better than the IQ options for AM OOK signals.
piam myrec_n.wav myrec.rfa
Transmit with RPiTX
Use the following command to transmit with RPiTX, ensuring that you set the frequency to the correct value for your wireless device.
sudo rpitx -m RFA -i myrec.rfa -f 434004
Troubleshooting
If it doesn’t work first time try these steps:
Make another longer recording with the button pressed down for longer.
Play with the normalization, e.g. try –norm=0 vs –norm=-3.
Ensure that you have a wire attached to the correct pin.
Try the alternative RPiTX pin with the ‘-c 1’ flag.
Leandvb is command line based lightweight DVB-S decoder designed for receiving Digital Amateur TV, including signals like HamTV from the International Space Station. The RTL-SDR can be used together with leandvb and it turns out that leandvb can also be used to decode the Outernet signal. If you were unaware, Outernet is a free L-band based satellite service that provides content such as news, weather data, APRS repeats and more. Currently you can get about 20MB of data a day. Outernet receivers are also all based around the RTL-SDR, allowing for very cheap receivers to be built. At the moment you’ll need a C.H.I.P or their specialized Dreamcatcher hardware to run their special Skylark OS with software decoder, but a general Armbian decoder is in the works.
Alternatively leandvb can be used, and over on their website the folks behind the leandvb software have uploaded a tutorial showing how to use leandvb to decode Outernet. Thanks to some reverse engineering attempts by Daniel Estévez, it was discovered that the Outernet modulation is very similar to DVB-S so the standard decoder can be used with some custom flags. Leandvb only outputs raw frames, not decoded data. They haven’t tested it, but it may be possible to feed the frames into Daniel Estevez’s free-outernet project for obtaining the final files.
During the testing they also discovered some interesting notes about the E4000 and R820T RTL-SDRs. For example by patching the R820T2 drivers to add some additional VGA gain they were able to make the R820T2 chips more sensitive at the Outernet frequency compared to the E4000 chip by bringing the signal further out of the quantization noise. They also tested a 60cm dish vs a patch antenna and found that the dish works significantly better.
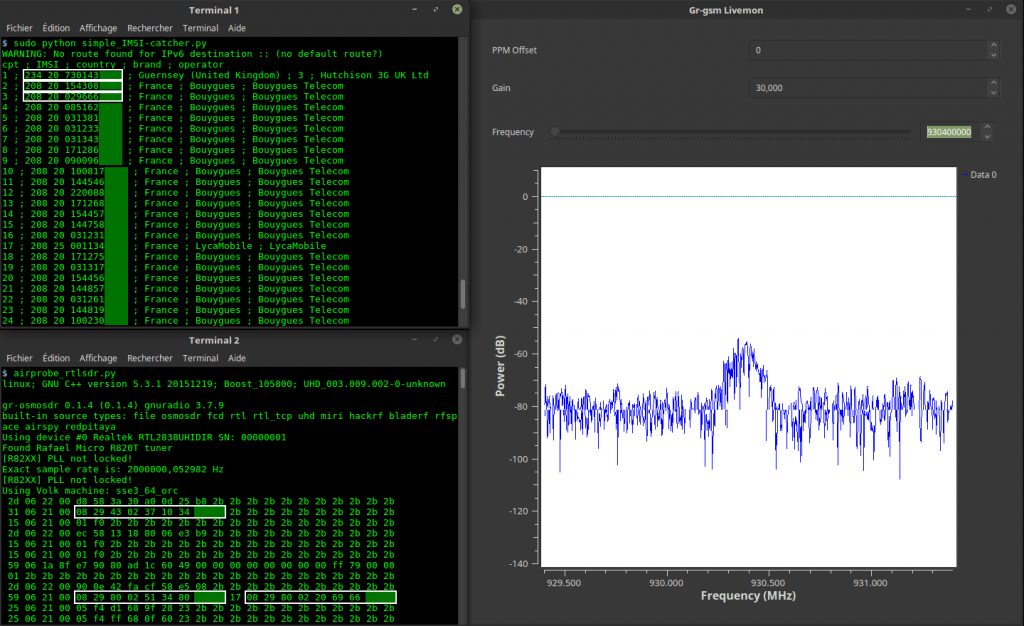
Over on YouTube user Keld Norman has uploaded a video showing how he uses an RTL-SDR with gr-gsm and a Python script to create a simple IMSI catcher. IMSI stands for International mobile subscriber identity and is a unique number that identifies a cell phone SIM card in GSM (2G) mobile phone systems. For security IMSI numbers are usually only transmitted when a connection to a new cell tower is made. More advanced IMSI-catchers used by governmental agencies use a fake cell tower signal to force the IMSI to always be revealed. This way they can track the location of mobile phones as well as other data like who or when you are calling.
In the video Keld uses a Python script called IMSI-Catcher. This script displays the detected IMSI numbers, country, and mobile carrier on a text display. The video description shows how to install GR-GSM and the IMSI-Catcher script on Ubuntu.
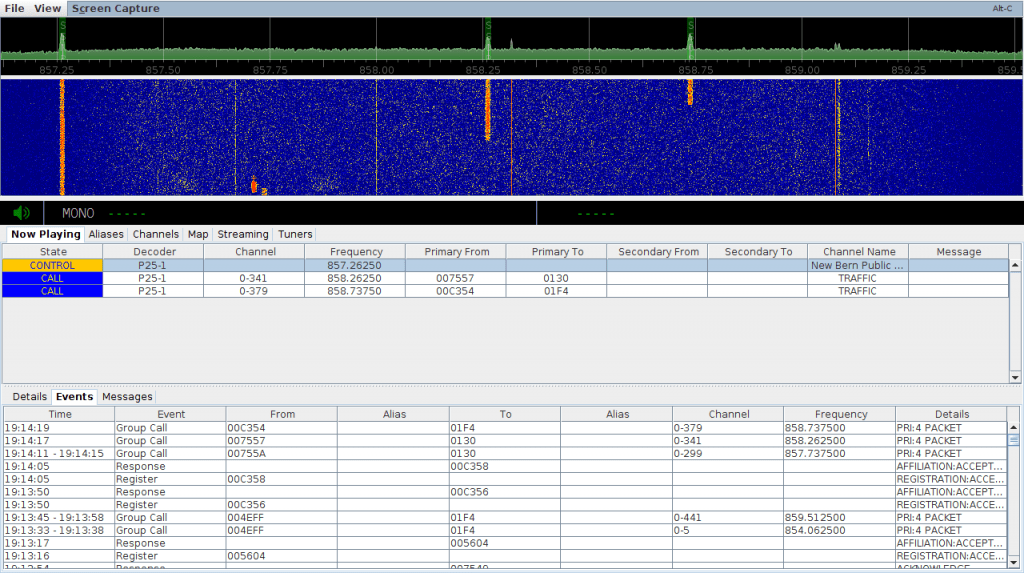
Over on his blog John Hagensieker has uploaded a tutorial that shows how to set up SDRTrunk with RTL-SDR dongles. SDRTrunk is an application that allows you to follow trunked radio conversations, and decode some digital voice protocols such as P25 Phase 1. It is similar to Unitrunker and DSDPlus combined into one program. It is also Java based so it is cross platform and so can be used on Linux and MacOS systems as well.
John’s tutorial contains many useful screenshots, so it should be great for a beginner. He starts from the beginning, with finding trunking frequencies over on radioreference.com, then goes on to the installation and use on Linux. He also later explains how the Airspy can be used instead of multiple RTL-SDR to cover 10 MHz of bandwidth so that multiple systems can be monitored.
SDRTrunk Running and decoding a P25 Phase 1 System